Thursday, December 3, 2015

Linux Services - From Oracle Linux 6 to Oracle Linux 7

Oracle Linux 7 is based on Fedora19, where the previous Oracle Linux 6, 5 are based on Red hat Enterprise. The switch from sysvinit to systemd is now part of the Enterprise Linux distributions. Below is just some simple commands to start/stop services


Starting and stopping service

#systemctl stop httpd

#systemctl start httpd

#systemctl restart httpd

#systemctl status httpd


Autostart service when boot, chkcofig replaced with

# systemctl start dbora.service

# systemctl enable dbora.service


List of services currently running

systemctl list-units --type service


I’ll update this post when new commands discovered.

Thursday, November 19, 2015

Reset Windows Server Admin Password


Unfortunately, today you’ve forgot the windows server password but good news is, Microsoft make it easy for you to reset the admin password. All you need is the Windows Server CD.

I tried on my test VM, which is a domain controller, and it works too! As this a test VM, this is the only domain controller server.


1. Boot off the Windows disk and select the “Repair your computer” option from the lower left-hand corner.

image

2. Follow through until you get to the option to open the Command Prompt

image


3. Backup and move the utilman.exe file with the command below,

Note: for some system, you may change the c: to d:, you’ll need to know where is the windows file.

# MOVE C:\Windows\System32\Utilman.exe C:\Windows\System32\Utilman.exe.bak

image

4. Now copy the cmmd.exe and rename it Utilman.exe:

# COPY C:\Windows\System32\cmd.exe C:\Windows\System32\Utilman.exe

image

5. Reboot your machine. When its done booting up again and you are at the Logon screen, click on the Ease of access icon.

image


6. At the command prompt, to change the password type:

# net user administrator *

7. Once you press enter you will asked to set a new password and then confirm it, when entering your new password don’t worry if you can’t see them as you type, they are invisible, they are however being saved.

image


8. Once you’re logged in again,  go to C:\Windows\System32\, delete the Utilman.exe and then rename Utilman.exe.bak back to plain old Utilman.exe.

Tuesday, September 8, 2015

Chrome version 45 and weak Diffie-Hellman public key

You upgraded chrome.

It's important to understand changes being made to the browser before installing updates.

Chrome 45 blocks all https connections when the cipher suite is diffie-hellman and the DH keysize is < 1024 bits.


Solutions:

1.       Upgrade your web server to use 2048-it Diffie-Hellman group.

2.       Temporary solutions for Chrome
          
     - open CMD/DOS
      - Navigate to the directory where chrome.exe lives and then paste:   

chrome.exe --cipher-suite-blacklist=0x0088,0x0087,0x0039,0x0038,0x0044,0x0045,0x0066,0x0032,0x0033,0x0016,0x0013

or 

                        "C:\Program Files (x86)\Google\Chrome\Application\chrome.exe" --cipher-suite-blacklist=0x0088,0x0087,0x0039,0x0038,0x0044,0x0045,0x0066,0x0032,0x0033,0x0016,0x0013


More info for Weak Diffie-Hellman and the Logjam Attack:


Sunday, July 12, 2015

Removing Corrupted Shadow Copies

Sometimes, corrupted shadow copies cannot be deleted by issuing the "vssadmin delete shadows /all" command. Instead, you receive the error:

"Error: Snapshots were found, but they were outside of your allowed context. Try removing them with the backup application which created them."

Corrupted VSS stores in C:\System Volume Information and might taken up large amount of disk space.


Solutions:

Launch an elevated command prompt on the Agent machine(s) involved and type the following:

# diskshadow

# list shadows all

# delete shadows set  {id of shadow to be deleted if selective deletion is to be performed}<enter>

OR

# delete shadows all {if all shadows are to be deleted}.


This will delete the corrupted shadow copies.

Saturday, June 6, 2015

Microsoft Reverse Proxy – IIS ARR (Application Routing Request)


Many of you already familiar with the concept of reverse proxy – A reverse proxy taking requests from the Internet and forwarding them to servers in an internal network. Those making requests to the proxy may not be aware of the internal network.  As Forefront TMG 2010 is becoming end of life, at the moment only supported Reverse Proxy solution from Microsoft is IIS ARR.

My most favour feature is it capable of doing routing based in URL request. If you are running multiple web servers like me, you’ll end up having a large pool of public IP address NAT to each web server. With ARR, we only need a single public IP, based on the URL header, it will redirect you to the server/server farm, and is easy for me publish/unpublish my web servers. It others feature like

- Hide the characteristic of the origin server

- Load balancer

- SSL offload

- Caching


Prerequisites to Install IIS ARR

1. The IIS ARR server need not be domain joined. It's your choice to decide if you want to domain join this server or not.

2. The IIS ARR server should have two NICs, one for the internal network and the other for the external network.

3. If you're not using an internal DNS server, you should update the HOSTS file on the IIS ARR server so that it can perform name resolution for the internal CAS and the published Exchange namespaces.

4. For SSL binding, 1 public IP and port 443 can only bind to 1 certificate, so make sure you use wild card certificate. If you are hosting multiple domain, you can either use SAN certificate or use multiple IP for each different certificate.


Install ARR

1. Install IIS on Windows Server 2012R2 with all defaults, nothing too smart.

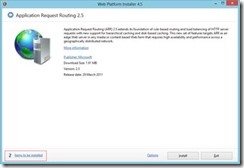
2. Use Microsoft Web Platform Installer to install IIS ARR 3.0

3. You’ll get the first installation screen, telling you it will install 2 features:

image001

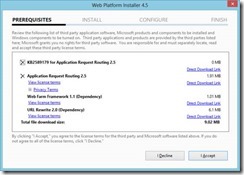
4. Hitting “Install” will show you the features you’re about to install. That’s 4 components all together:

image002

5. Click “I Accept” and enjoy the commercial content from Microsoft whilst the installation is taking place:

image003

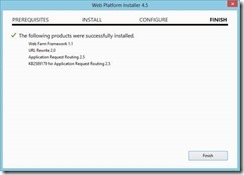
6. When the installation is finished, You’ll see it has installed four components:

image004

7. Open IIS Manager, and you’ll see you have two new features:

· “Server Farms” under the server node.

· “Web Platform Installer” in the management node.

image005


SSL Binding

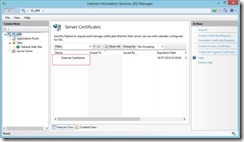
1. Import your external certificate to the server:

image006

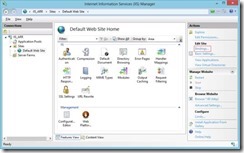
2. Navigate to your default website in IIS Manager and click “Bindings”:

image007

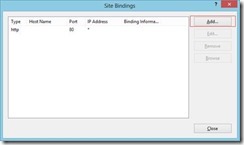
3. You’ll see it has only the HTTP binding. Click “Add” to edit the HTTPS binding:

image008

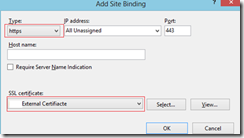
4. Choose “HTTPS” from the drop down menu, then choose your External certificate, and press “OK”:

image009

5. This completes the SSL certificate configuration of the web site.

Note: Remember the rule for SSL - 1 public IP and port 443 can only bind to 1 certificate, so make sure you use wild card certificate. If you are hosting multiple domain, you can either use SAN certificate or use multiple IP for each different certificate.


Publishing website via MS IIS ARR

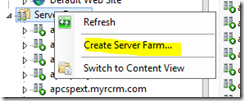
1. From IIS, Right click Server farm and “Create Server farm”

image010

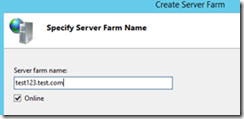
2. Enter a server farm name, for naming conventions, make it the same as your public name.

image011

3. On this screen, make sure the server address is correct and reachable, otherwise you might want to create a host entry. Make sure the http and https port is correct then click “Add” and finished.

image012

4. If the message pops up, click NO

image013

5. Navigate to the server farm and you can configure other settings as you wished.

image014

6. Navigate to the root and select URL rewrite

image015

7. Add a blank rule

image016

8. Create the rule according to image below,

I like to make the name same as public URL

Under confitions,

{HTTPS} ---> this means SSL and HTTPS is turned on

{HTTP_HOST}  --> this is the public URL

image017

9. Under the action type, choose “Route to server farm

image018

10. Click Apply and you are finished.

image019

11. Next step is configure Public DNS and make sure your firewall/router has port forwarding rules applied.


Reference:

https://alinzaman.wordpress.com/2013/09/18/reverse-proxy-for-websites/

http://y0av.me/2013/07/22/lync2013_iisarr/

Saturday, May 23, 2015

Linux inode Full and error “Can’t create/write to file”


From Wiki

In a Unix-style file system, an index node, informally referred to as an inode, is a data structure used to represent a filesystem object, which can be one of various things including a file or a directory. Each inode stores the attributes and disk block location(s) of the filesystem object's data. Filesystem object attributes may include manipulation metadata (e.g. change, access, modify time), as well as owner and permission data (e.g. group-id,user-id, permissions).

A Linux directory lists other filesystem objects by name, normally identifying the listed object by referring to its inode. The directory contains an entry for itself, its parent, and each of its children.

If inode is full, you may face issue with error message similar “Can’t create/write to file”

To check how much inode has already consumed, use the command

# df -i /<directory>

you won’t be able to create file or write to file in that directory if indoe is 100% full.


In my case, i saw lots of empty files generated by faulty applications, so i just delete using rm –f command


You can also run the following cronjob to keep /<directory> clear.

Run crontab -e and add the following:
0 */4 * * * /usr/sbin/tmpwatch -am 12 /<directory>

Thursday, May 14, 2015

Don’t underestimate the RAID controller on your server !!

Dell PERC Controller – RAID card


We have Dell Server PowerEdge R620, running Oracle VM virtualization. We noticed that the disk performance is very poor, much like USB2.0 speed, 22.4 MB/s, this is unacceptable for server.
clip_image001
Our disk configuration is RAID 5, 6x 10K, 6G SAS HDD, 900GB
Upon investigation, we realized the RAID controller card that we purchased, Dell Perc H310 is a budget raid controller. That causes the bottleneck.
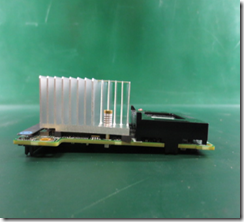
Luckily, there is a “drop in replacement” H310 to H710p. Model shown below is H310 mini mono.
clip_image002
clip_image003
clip_image004


After i changed the RAID controller to PERC H710p, ran the same test,
 
clip_image005
 
Woww! 139 MB/s – that’s a massive improvements!!


With the same test, but with 5GB file, 300MB/s


but.... don;t get too excited yet...


You may have a fast 15K or SSD disk but having a good RAID controller is important too. Slow RAID controller with fast disk behind means you are not utilizing the full potential.
Once the card is in, choose you caching method.


There are three main caching techniques that can be deployed, each with their own pros and cons.
· Write-through cache directs write I/O onto cache and through to underlying permanent storage before confirming I/O completion to the host. This ensures data updates are safely stored on, for example, a shared storage array, but has the disadvantage that I/O still experiences latency based on writing to that storage. Write-through cache is good for applications that write and then re-read data frequently as data is stored in cache and results in low read latency.
· Write-around cache is a similar technique to write-through cache, but write I/O is written directly to permanent storage, bypassing the cache. This can reduce the cache being flooded with write I/O that will not subsequently be re-read, but has the disadvantage is that a read request for recently written data will create a “cache miss” and have to be read from slower bulk storage and experience higher latency.
· Write-back cache is where write I/O is directed to cache and completion is immediately confirmed to the host. This results in low latency and high throughput for write-intensive applications, but there is data availability exposure risk because the only copy of the written data is in cache. As we will discuss later, suppliers have added resiliency with products that duplicate writes. Users need to consider whether write-back cache solutions offer enough protection as data is exposed until it is staged to external storage. Write-back cache is the best performing solution for mixed workloads as both read and write I/O have similar response time levels.


Result after write back cache enabled,


double the speed again... it is 572MB/s ... now that's what i called Server speed !!


Reference:
http://en.community.dell.com/support-forums/servers/f/906/t/19533325
http://en.community.dell.com/support-forums/servers/f/906/t/19606391
http://www.computerweekly.com/feature/Write-through-write-around-write-back-Cache-explained


Monday, May 11, 2015

Lync 2013 Control Panel error - 00002098: SecErr: DSID-03150BB9, problem 4003 (INSUFF_ACCESS_RIGHTS)

When trying to edit user in Lync Control Panel 2013, I encounter this error

Active Directory operation failed on "<DC>". You cannot retry this operation: "Insufficient access rights to perform the operation

00002098: SecErr: DSID-03150BB9, problem 4003 (INSUFF_ACCESS_RIGHTS), data 0".You do not have the appropriate permissions to perform this operation in Active Directory. One possible cause is that the Lync Server Control Panel and Remote Windows PowerShell cannot modify users who belong to protected security groups (for example, the Domain Admins group). To manage users in the Domain Admins group, use the Lync Server Management Shell and log on using a Domain Admins account. There are other possible causes. For details, see Lync Server 2010 Help.

clip_image002

Solutions

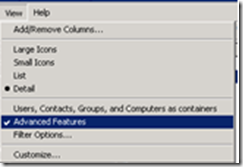
From dsa.msc (Active Directory Users & Computers) make sure that you are viewing advanced features; from the view menu select Advanced Features.

clip_image003

Find the user in question, edit the users properties, click the security tab, then click advanced. You need to tick the “Include inheritable permissions from this object’s parent” tick box to re propagate the required permissions.

clip_image004

Retry any Lync user changes and this time they should be successful.

Friday, May 1, 2015

Custom report from Dynamics CRM takes long time to load

When triggered custom report from CRM, it takes long time to run. It will display the report but it just takes some time. This is due to CRM and SSRS seeking authentication from Active Directory. If the AD is slow, this will affect the performance.

To solve this issue, make sure the AD is reachable (preferable on the same subnet), then create/set registry key on both CRM and SSRS server for a preffered Domain Controller,

HKLM\Software\Microsoft\MSCRM registry hive

    • Name: PreferredDC
    • Type: String
    • Value: <DC_Name>

Active Directory upgrade 2003 to 2008R2 with error “An Authentication Error Has Occurred. The Encryption Type Requested Is not supported by the KDC”

we experinced that after upgraded the Domain and Forest Level from 2003 to 2008R2, after a day, I cannot connect to my Hyper V Virtual machines with following error ” An Authentication Error Has Occurred. The Encryption Type Requested Is not supported by the KDC”. On the Exchange 2010 server, the transport server stopped and follow error message on application event log,
“ Process MSEXCHANGEADTOPOLOGYSERVICE.EXE (PID=xxxx). Topology discovery failed, error 0×80040952 (LDAP_LOCAL_ERROR (Client-side internal error or bad LDAP message))….”
“Process STORE.EXE (PID=xxxx). All Global Catalog Servers in forest DC=xxx,DC=xx,DC=xx are not responding.”
”Process STORE.EXE (PID=xxxx). All Domain Controller Servers in use are not responding”

A simple resolution to all this trouble is to restart the KERBEROS DISTRIBUTION KEY or KDC service on all Domain controllers. While simply restarting the Service will solve the problem, probably better off just doing a proper restart after upgrading your functional levels, only from 2003 to 2008 / 2008 R2.

Image result for windows 2003 eos

Wednesday, April 22, 2015

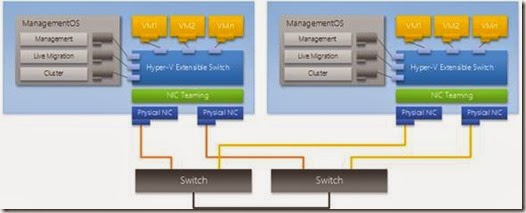
Hyper V 2012R2 NIC Teaming / Converged Network Fabric


NIC teaming, also known as Load Balancing/Failover (LBFO), allows multiple network adapters to be placed into a team for the purposes of

• bandwidth aggregation, and/or

• traffic failover to maintain connectivity in the event of a network component failure.


For Hyper V 2012R2, the recommended and best practice is to use “Switch Independent configuration / Dynamic distribution”

clip_image002


This will also include the concept of converged fabric and network virtualization.


This configuration will distribute the load based on the TCP Ports address hash as modified by the Dynamic load balancing algorithm. The Dynamic load balancing algorithm will redistribute flows to optimize team member bandwidth utilization so individual flow transmissions may move from one active team member to another. The algorithm takes into account the small possibility that redistributing traffic could cause out-of-order delivery of packets so it takes steps to minimize that possibility.

The receive side, however, will look identical to Hyper-V Port distribution. Each Hyper-V switch port’s traffic, whether bound for a virtual NIC in a VM (vmNIC) or a virtual NIC in the host (vNIC), will see all its inbound traffic arriving on a single NIC.

This mode is best used for teaming in both native and Hyper-V environments except when:

a) Teaming is being performed in a VM,

b) Switch dependent teaming (e.g., LACP) is required by policy, or

c) Operation of a two-member Active/Standby team is required by policy.

To configure NIC teaming in Hyper V, Hyper V must be already installed on the system and switch port is configured as trunk port.


Before running the command, make sure the Hyper V role is enabled.


Command

New-NetLbfoTeam -Name ConvergedTeam -TeamMembers NIC1,NIC2,NIC3,NIC4 -LoadBalancingAlgorithm Dynamic -TeamingMode SwitchIndependent

New-VMSwitch -Name VMNET -NetAdapterName ConvergedTeam -AllowManagementOS $False -MinimumBandwidthMode Weight

Set-VMSwitch "VMNET" -DefaultFlowMinimumBandwidthWeight 3


Add-VMNetworkAdapter -ManagementOS -Name "Management" -SwitchName "VMNET"

Add-VMNetworkAdapter -ManagementOS -Name "LiveMigration" -SwitchName "VMNET"

Add-VMNetworkAdapter -ManagementOS -Name "HeartBeat" -SwitchName "VMNET"


Set-VMNetworkAdapterVlan -ManagementOS -VMNetworkAdapterName "Management" -Access -VlanId 210

Set-VMNetworkAdapterVlan -ManagementOS -VMNetworkAdapterName "HeartBeat" -Access -VlanId 211

Set-VMNetworkAdapterVlan -ManagementOS -VMNetworkAdapterName "LiveMigration" -Access -VlanId 212

Set-VMNetworkAdapter -ManagementOS -Name "LiveMigration" -MinimumBandwidthWeight 20

Set-VMNetworkAdapter -ManagementOS -Name "HeartBeat" -MinimumBandwidthWeight 40

Set-VMNetworkAdapter -ManagementOS -Name "Management" -MinimumBandwidthWeight 5


# Set IP Address Management

New-NetIPAddress -InterfaceAlias "vEthernet (Management)" -IPAddress 192.168.210.21 -PrefixLength "24" -DefaultGateway 192.168.210.7

Set-DnsClientServerAddress -InterfaceAlias "vEthernet (Management)" -ServerAddresses 192.168.204.34, 192.168.204.219


# Set LM and CSV

New-NetIPAddress -InterfaceAlias "vEthernet (LiveMigration)" -IPAddress 192.168.211.21 -PrefixLength "24"

New-NetIPAddress -InterfaceAlias "vEthernet (HeartBeat)" -IPAddress 192.168.212.21 -PrefixLength "24"

Repeat the same command on another node if running in cluster mode (Of course IP address must be change)


Lastly, configure your switch, switchport as trunk port, and specified all VLAN used in your switch.


When creating a new Virtual machine, remember to add vlan ID to the network adaptor,

image


Reference:

https://technet.microsoft.com/en-au/library/dn550728.aspx#BKMK_Example

http://www.microsoft.com/en-us/download/details.aspx?id=40319

Friday, April 17, 2015

NTP time for Domain Controller

Time in windows domain is crucial. 5 minutes different between server and client will not allowed client to login to the computer, subsequently all authentication and encryption might just failed. by default, all domain joined client will get their time from Domain controller. If your domain controller is virtualized, strongly suggest you don’t use any hypervisor tool(VMWare tool or HyperV integration tool) to sync time between domain controller and the hypervisor hosts. Time syncing option must unchecked.


To configure the domain controller to sync with external time source.


  1. Login to primary domain controller
  2. Start cmd or powershell with administrator privilege
  3. Execute to command as below,
    # w32tm.exe /config /manualpeerlist:”0.us.pool.ntp.org 1.us.pool.ntp.org 2.us.pool.ntp.org.us.pool.ntp.org” /syncfromflags:manual /reliable:YES /update
    image
  4. Notes: You can find the closest time server near you by browsing the following page and clicking on the nearest zone:!http://www.pool.ntp.org/zone/@

  5. run the command to update,
    # w32tm.exe /config /update
  6. Restart windows time service
    (For Powershell)
    # Restart-Service w32time
    (For CMD)
    # net stop w32time
    # net start w32time

    image


That’s all !

if you have any domain member, you can either wait until the next synchronization or restart w32time service to sync time with domain controller.

Wednesday, April 8, 2015

Two unknown devices in Windows Server 2008 R2 under Hyper-V 2012 R2


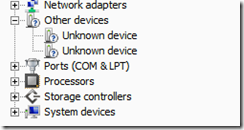
Hyper-V integration components for Windows Server 2012 R2 do not install the device drivers for two devices on servers running Windows Server 2008 R2.  They are listed as unknown devices in device manager:

clip_image001

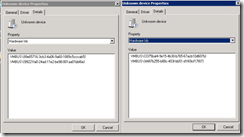
More detailed analysis shows the device information as follows:

Device 1 Hardware Ids:
VMBUS\{f8e65716-3cb3-4a06-9a60-1889c5cccab5}
VMBUS\{99221fa0-24ad-11e2-be98-001aa01bbf6e}

Device 2 Hardware Ids:
VMBUS\{3375baf4-9e15-4b30-b765-67acb10d607b}
VMBUS\{4487b255-b88c-403f-bb51-d1f69cf17f87}

clip_image002

Resolutions:

1. Insert the HyperV integration disk, open it up go to the folder - support/amd6,

2. Extract Windows6.2-HyperVIntegrationServices-x64.cab file to a location (In this example the desktop)

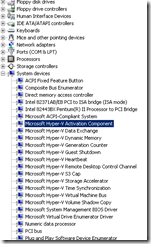
3. Manually launched the update driver wizard from device manager and pointed to the extracted files from the cab file. 

The first device prompts you with a driver publisher warning, not quite sure why this is the case since Microsoft is the publisher of these drivers:

clip_image003

Installing the driver software has not caused me any issues. 

clip_image004

Hyper V 2012 R2 Replica between different domains (Cluster-to-cluster)

Hyper V replica between two different domains (cluster-to-cluster)

Background

For Hyper V to replica between 2 different domains, we must enable certificate based authentication, preferable a wild card certificate. Our scenario, Hyper V 2012R2 with 2 nodes cluster on primary site (cluster name MYRSVMH8.primary.local). On the replica site, Hyper V 2012R2 with 2 nodes cluster (cluster name is HVC02.replica.local). This is assumed your cluster is configured and running.

In summary, the steps are

1. Pre-stage replica broker object

2. Create cluster replica broker

3. Generate certificate for authentication

4. Enable replica broker on replica site

5. Host files

6. Configure VM for replication

7. Configure storage location on replica site


Pre-stage the computer objects

1. Pre-stage a computer object in the Hyper-V OU that is the name of the Replica Broker role you wish to create (e.g. Replica). Once the object is created, you will then need to go to the Security tab, add the cluster computer object; finally, give it full control.

Here you can see the pre-staged computer object I created in my Hyper-V OU:

clip_image001[4]

2. After creating the object, called REPLICA, I right-clicked on it then went to the Security tab. Next, I added the Cluster computer object and gave it full control. (In this screenshot, you’ll notice my cluster is named HV1-HV2-2012CLU.) Click Apply then OK.

clip_image002[4]

clip_image003[4]

3. Repeat steps 1 the same on the replica site AD, change the object named to REPLICABROKER

clip_image004[4]

clip_image005[4]


Create cluster replica broker

1. On the primary site cluster node,

2. Open the Failover Cluster

3. Configure Role

4. Select Hyper-V Replica Broker and hit "Next"

5. Add the Name of the replica broker e.g “replica” (Note: this will be translated as an fqdn and also will be add on the domain controller the a record replica.primary.local)

6. Add the IP for the Replica Broker (172.18.70.121), same subnet as management IP

7. Then click "Finish"

clip_image007[4]

8. Repeat the same on the replica site, change the replica Broker name to “replicabroker

clip_image008[4]


Generate certificate for authentication

1. Download a tool named makecert.exe on your local machine (window 8, windows 8)

http://www.microsoft.com/en-us/download/confirmation.aspx?id=8279

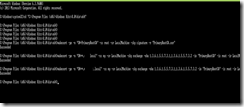
2. Generate the wildcard certificate for primary and replica site

C:\Windows\system32>cd "C:\Program Files (x86)\Windows Kits\8.0\bin\x64"

# create a root certificate

C:\Program Files (x86)\Windows Kits\8.0\bin\x64>makecert -pe -n "CN=PrimaryRootCA" -ss root -sr LocalMachine -sky signature -r "PrimaryRootCA.cer"

#create primary site certificate, *.primary.local

C:\Program Files (x86)\Windows Kits\8.0\bin\x64>makecert -pe -n "CN=*.primary.local" -ss my -sr LocalMachine -sky exchange -eku 1.3.6.1.5.5.7.3.1,1.3.6.1.5.5.7.3.2 -in "PrimaryRootCA" -is root -ir LocalMac

# create replica site certificate, *.replica.local

C:\Program Files (x86)\Windows Kits\8.0\bin\x64>makecert -pe -n "CN=*.replica.local" -ss my -sr LocalMachine -sky exchange -eku 1.3.6.1.5.5.7.3.1,1.3.6.1.5.5.7.3.2 -in "PrimaryRootCA" -is root -ir Loca
clip_image009

3. Export the certificates to all nodes in primary and replicate site

*.primary.local certificate goes to primary site

*.replica.local goes to replica site

4. Open the MMC -> Add/Remove Snap-In -> Add Certificate -> Computer Account -> Next,Next & Finish

5. We go to Personal -> Certificates and with right-click Export the *.primary.local and *.replica.local Certificate. We proceed with Export including the key and the file will be as .pfx also you have to give a password for the certificate.

6. Copy the .pfx file to every Hyper V server,

*.primary.local certificate goes to all nodes in primary site

*.replica.local goes to all nodes in replica site

7. Import the certificate on every nodes, to do this,

MMC -> Add/Remove Snap-In -> Add Certificates -> Computer Account -> Next, Next & Finish

then we navigate to Personal -> Certificates -> Right-click and Import -> You must give the password that you have setup on the step 5

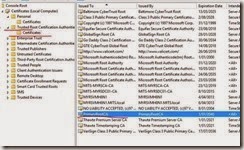
8. Copy the primary root certificate to Trusted Root Certificate Authorities
clip_image011

9. Before we proceed with the replica configuration we have to disable the Revocation Check. This we have to do it on every Hyper-V server (primary site (stand alone nodes) and replica site (cluster nodes). To do this we must run this two commands bellow from an elevated command prompt (cmd):

reg add "HKLM\SOFTWARE\Microsoft\Windows NT\CurrentVersion\Virtualization\FailoverReplication" /v DisableCertRevocationCheck /d 1 /t REG_DWORD /f

reg add "HKLM\SOFTWARE\Microsoft\Windows NT\CurrentVersion\Virtualization\Replication" /v DisableCertRevocationCheck /d 1 /t REG_DWORD /f

clip_image013


Enable replica broker on replicate site

After we have finished with the Import of the CA certificate and the ReplicaSite certificate and also with the disable of the Revocation Check we must select it to the Replica Broker configuration. To do this follow the steps bellow:

1. Open The Failover Cluster on replica site and Navigate to Roles

2. Right-click on the replica broker and select "Replication Settings"

3. Check the "Enable this Cluster as a Replica Server"

4. Check the "Use certificate-based Authentication (HTTPS)"

5. Specify the port on 443 (leave it as it is)

6. Now you must select the ReplicaSite Certificate that we have created and imported it to the Hyper-V Cluster nodes

7. Specify the Cluster Storage directory

8. And click OK

9. open the Inbound Replica Broker rule on the Advanced Firewall of all Hyper-V nodes (the rule has been automatically created and named as: Hyper-V Replica HTTPS Listener (TCP-In)), for all profiles


Host files

1. Since they are in 2 different domains, they might not use the same DNS server

2. For every nodes on primary site, update the host file to include

172.18.70.120 replicabroker.replica.local

172.18.70.101 HVC02N1.replica.local

172.18.70.102 HVC02N2.replica.local

3. For every nodes on replica site site, update the host file to include

172.18.70.121 replica.primary.local

172.18.70.11 MYRSVMH8N1.primary.local

172.18.70.12 MYRSVMH8N2.primary.local


Configure VM for replication

1. Open The Failover Cluster on primary site

2. Right-Click on the VM you want to replicate and select Enable Replication

3. Just hit "Next" on the first page with the description "Before You Begin"

4. Specify the Replica Server, you must add the FQDN for the replica site (just to mention, all the Hyper-V nodes and the Replica Broker must have access to Internet and have FQDNs in the public dns servers of your Infrastructure so thay can "communicate" also they must have open the port 443 on the local firewall or if you use a dedicated appliance and NAT you must do the Network config there too) for me the FQDN is replicabroker.replica.local and hit "Next"

5. After the Verification of the Replica we must specify the Connection Parameters. The only thing in that page that we must change (of course based on our scenario) is the Certificate, so we must select the Certificate with FQDN that we have been created based on the current server.

6. "Next" on the Replication VHD In the Configure Recovery History you can configure whatever you want on your scenario and "Next"

7. Initial Replication again whatever you want to do on your scenario "Next"

8. "Finish" if all of the above is setup correct you must see the Enable Replication pop-up window and after a second (based on your network) you must see in the Hyper-V Manager on the Status, the percentage of the Replication.


Configure storage location on replica site

1. Locate the VM which you want to replicate to a storage location other than the default you configured in step 1 and right-click the VM, then drag down to Enable Replication.

2. The Enable Replication Wizard starts and takes you through a series of questions to configure replication for this VM. At the Choose Initial Replication Method screen, make sure you schedule the initial replication by selecting "Start replication on" and specify a date. This process will create the initial files and place them in the default location for replicating VM but the files are relatively small in size and can be very easily moved.

3. Now go to Hyper-V Manager, select the VM and choose to move the VM.

4. Select the storage destination you want this VM to replicate to.

5. Return to the primary server where the VM is hosted and where you want to initiate the replication from; to do this, right-click the VM | Replication | Start Initial Replication.

6. Select Start replication immediately. Locate the VM which you want to replicate to a storage location other than the default you configured in step 1 and right-click the VM, then drag down to Enable Replication.

7. The Enable Replication Wizard starts and takes you through a series of questions to configure replication for this VM. At the Choose Initial Replication Method screen, make sure you schedule the initial replication by selecting "Start replication on" and specify a date. This process will create the initial files and place them in the default location for replicating VM but the files are relatively small in size and can be very easily moved.

8. Now go to Hyper-V Manager, select the VM and choose to move the VM.

9. Select the storage destination you want this VM to replicate to.

10. Return to the primary server where the VM is hosted and where you want to initiate the replication from; to do this, right-click the VM | Replication | Start Initial Replication.

11. Select Start replication immediately.